Thursday, June 18, 2015

False Hope Campaign - Iron Warriors Vs Marines Errant

Prologue - 

The Warpsmith fled to the north after being defeated twice by the greenskins.  He had one chance left to prove himself to Lord Boroth.  He would have to stop the retreating Marines Errant.

The Marines Errant had been defending the fortress on False Hope in a protracted siege battle against the Iron Warriors and a massive traitor guard army.

After tearing down the walls of the fortress and stealing the space marine gene seed the Marines Errant were guarding, the Orks attacked from below burrowing up from tunnels they had been making for weeks.  The Marines Errant were stuck between a rock and a hard place and had to break out.

The Space Marines broke through the Iron Warriors lines and tried to escape, saving what gene seed they could.

Now they are fleeing through the ruins of the city of False Hope and the Iron Warriors have set up a defensive position to stop them.

Mission - 

We played Breakthrough, which is a mission in the Stronghold Assault book.  The Iron Warriors would be defending against the Marines Errant.  It was a 2250pt game and the Marines Errant had the new codex in hand.

This Breakthough mission was not a Maelstrom mission so no cards were involved.  He scored victory points for units of his moving off my board edge and for taking my 3 objectives in my deployment zone.  I scored points for holding onto my objectives (3 points each) and killing his units.

Slay the Warlord, First Blood and Line breaker were also in effect, however he could score Linebreaker multiple times.


We played on the planet of False Hope in hexes B3 (Imperial) and B8 (Chaos).

Army Lists - 

My army was a straight up CAD from the Chaos Space Marine Codex.  I also included a fortification with upgrades found in Stronghold Assault as listed below. I had to include a fortification since I was the defender ad the attacker could include an additional heavy support.

HQ - 
Warpsmith with Burning Brand of Skalathrax (Warlord)

Chaos Lord with powerfist and lightning claw meltabombs and sigil of corruption

Elites - 
Helbrute with twinlinked Lascannon and missile launcher

Helbrute with missile launcher

Helbrute with Plasma Cannon

Troops - 
9 marines missile launcher and flamer
1 champion with powerfist and combi-flamer
in rhino with havoc missile launcher

9 marines missile launcher and flamer
1 champion with powerfist and combi-flamer
in rhino with havoc missile launcher

7 marines flamer
1 champion with powerfist and combi-flamer
in rhino with havoc missile launcher

9 marines meltagun and autocannon
1 champion with powersword and meltabombs

19 cultists with 1 flamer and 15 autoguns
1 champion

Fast Attack -
4 raptors with 2 meltaguns
1 champion with meltabombs

Heavy Support -
Predator with autocannon and 2 heavy bolter sponsons

vindicator

6 havocs with 4 autocannons
1 champion with meltabombs

Fortifications - 
Aegis Defense Line with ammo dump, 3 tangle wires, 4 tank traps, 1 barricade


My opponents army list I do not have so I will simply point out some interesting bits (and because of the new codex there are definitely several).
Most of his army is visible in the picture below of our initial deployment.

His warlord was Chronos, who is in a Predator Annihilator.  This is possible because Chronos is now an HQ unit who is a character.  He buys a vehicle and then is part of that vehicle, he could even challenge if he wanted (although I am not sure how that would work).

He had a squadron of Dreadnoughts as an elite choice.  Pretty great thing to have since then you have 2 more elite slots that you can use for something else.  Note how I too had three dreadnoughts (helbrutes, whatever) but mine each took up their own elite slot.

It seemed like he had way more models than I did and I'm not sure if it was because I loaded up my marine squads with upgrades I don't normally do and so it lowered my model count or if the new marine codex truly saves points on units,either way I felt as if this was going to be a tough game.


Deployment - 


 The whole battlefield.

 The Iron Warriors defensive position.

 The Marines Errant.

A squad of scouts infiltrates.


Almost immediately a Marines Errant twin-linked lascannon blows one of the Iron Warriors' Helbrute's to pieces.

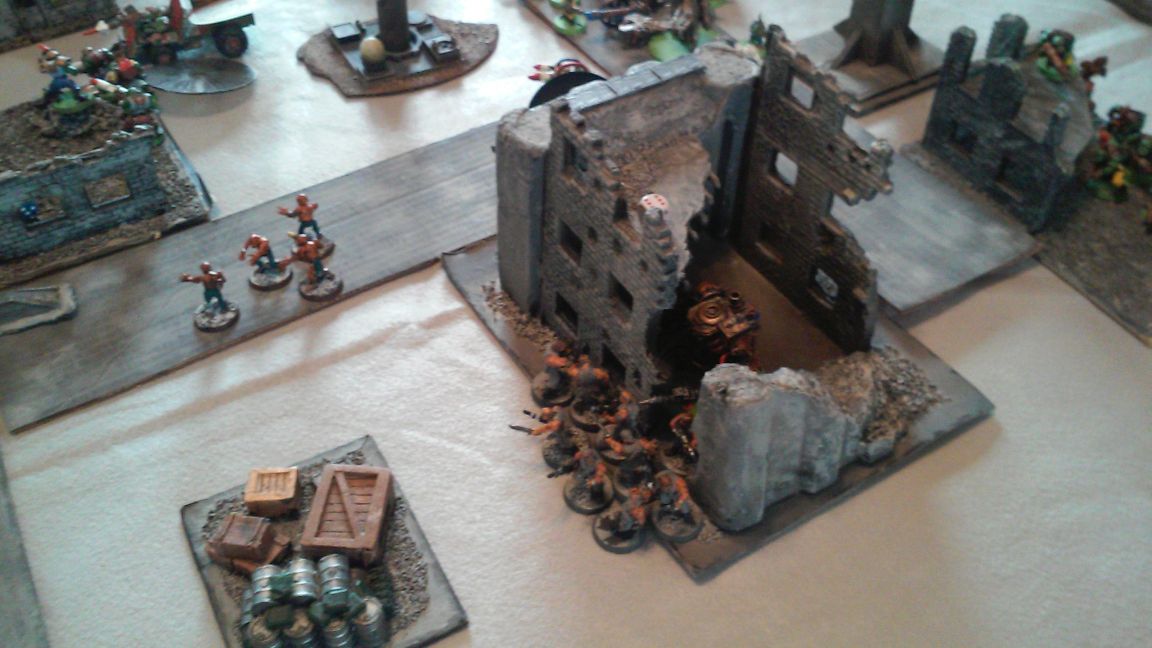
There was a Helbrute behind that emplacement.

The Iron Warriors Autocannons fire back blowing up a rhino on the road.  The Helbrute in the ruins also moves behind cover to avoid the incoming fire.


While the firefight continues the infiltrating scouts move up to the ruins and are joined by a razorback filled with Honour Guard.


Firing down the road , the predator kills several of the space marines who stumbled out of the wreckage.


The Iron Warriors tactical squad deploys out from their rhino and opens up on the covering scouts, killing three of their number.

The Raptors also jump into the ruins are open up with their meltaguns into the razorback only taking off 2 hullpoints.


Behind the Iron Warriors' vindicator a land speeder deepstrikes and fires its multimelta into the rear of the tank.  The vindicator is immobilized although I am sure the gunner wished for more.


The Honour Guard disembarks from the razorback and begins maneuvering into position.  The Dreadnoughts behind them continue their advance.


Meanwhile on the left flank of the Iron Warriors, a Predator closes the distance in support of a rhino filled with a tactical squad.


The Marines Errant are closing quickly on the Iron Warriors lines.  The Iron Warriors hope that they can withstand the next few turns.


The Warpsmith quickly disembarks from his rhino and fixes the vindicator's immobilized result.  The marines disembark from their rhino to take out the land speeder.


The Raptors jump behind the Honour Guard's Razorback and blow it up in assault with krak grenades and melta bombs.


The Marines Errant continue to advance and the Iron Warrior's hold their breath.


On the left flank the Iron Warriors strike back against the advancing loyalists.  Disembarking for their rhino an Iron Warriors tactical squad opens fire.


In the center the Iron Warriors brace for the inevitable assault from the Honour Guard and the dreadnoughts.


Another IW marine squad enters the ruins and blasts the scouts with bolters and flamers.


The Honour Guard charge the vindicator, destroying it.


The end of turn 5, and a 1 is rolled.  The game is over.  

Tallying up the points the Iron Warriors win 17 to 7.

Epilogue - 

The Iron Warriors' Warpsmith had successfully pushed back and stopped the Marines Errant from escaping the ruins of the fortress of False Hope.

Days or possibly weeks of brutal city fighting would now commence rooting out the loyalist marines.

For another day the Warpsmith could breath easy knowing that Boroth would not execute him....


Until next time.

Monday, June 15, 2015

Night Lords and Iron Warriors VS Orks! False Hope Campaign Game

Prologue - 
The Orks had beaten Necrosius and his traitor guard.  The Iron Warrior's Warpsmith was not happy. He had been tasked to stop the Ork advance by Lord Boroth and not wanting to fully commit his forces had sent Necrosius to do so.

Necrosius had failed.

The majority of his forces were pushing into the Imperial territory on False Hope and so he could only commit a small force to fight the greenskins.  He called upon another ally to aid him, the Night Lords.

Mission - 

Maelstrom Of War.  1500 points per person, 3000 points per side.  Vanguard Strike Deployment.
Joe - Orks, Bob - Orks, Seti - Night Lords, Myself - Iron Warriors

Campaign Info - 

We were fighting on False Hope.  The hexes we were fighting over were B21 (Orks) and B14 (Chaos).

Deployment Maps - 

The Ork Deployment 

Chaos Deployment

The left flank of the Chaos forces moves forward and almost immediately the Raptors are shot to pieces by the usually poor ork shooting.

This would not bode well for the forces of Chaos this day.


While the Raptors may have been weakened the remainder of the Chaos flank would continue to advance and threaten the Orks while the right side of the Chaos forces would shoot at the Ork line to little effect.


In the center a Night Lords rhino is able to disembark and open fire into the middle of the Ork lines.


The advance on the left flank is bolstered by a Hell Blade fighter.


The left flank attack opens fire on the Orks, killing many of them.


In the center, the depleted Raptors join their brethren in attacking the center of the Ork line.


The Ork flank collapses and the combined Chaos forces move in, trying to push their advantage.


In the center of the table the Iron Warriors Predator is stunned and needs to use its smoke launchers for a turn to repair.  An Iron Warriors' rhino also moves to threaten the newly reformed Ork line.


The Night Lords Chaos Lord and terminator retinue deep strike into a ruins right next to a squad of Ork Big Guns.  Unfortunately they were Kustom Kannons and combined with the Flash Gits in the nearby Battle Wagon, they blew the Terminators apart not leaving a single survivor.


A brave Night Lord Tactical Squad assaults a large mob of Boys while the Iron Warriors cautiously advance, preparing to eliminate the remaining Orks in a close range fire fight.


The Night Lords squad bravely fights and dies and the Iron Warriors prepare to strike.

There would be no survivors from that Ork squad when the guns stopped.

The Orks were beginning to thin out but so were the Night Lords.  There wasn't much left of the original forces, however the Ork Big Guns and Battle Wagon were still a massive threat.


The Iron Warriors Dreadnought successfully charges the Big Guns.  The Obliterators move down the street and the Rhinos would move into the Ork Deployment zone scoring some last minute victory points.


The Dreadnought would end the game in close combat.

At the end of the game while the Orks were reeling from the surprise attack on their left flank by the Night Lords and the guns of the Iron Warriors, it wasn't enough to win the scenario.

End Result - 

Orks - 15 victory points
Chaos - 13 victory points

Ork Victory 


Epilogue - 

The Warpsmith had been defeated twice in as many battles and his superiors were not happy.  He quickly had to leave the immediate area and rejoin his main force.

The wrath of Lord Boroth can be swift and ruthless.  He had to quickly win a battle were he to keep his head, and he knew it.

Fleeing north to regroup, he joined up with his main force to fight an enemy he knew very well.


Until next time...

Monday, June 8, 2015

False Hope Campaign - Apostles of Contagion Vs Orks

Prologue -

On the planet of False Hope a massive siege just took place.

The Marines Errant were holding a vast fortress containing valuable Space Marine Geneseed.  The Iron Warriors led the assault to take down the fortress and capture the Geenseed for their own uses.

The Iron Warriors struck at dawn, destroyed an entire wing of the fortress and stole the valuable material from the Marines Errant, but only just.

While the siege was going on, however, another player was entering the theater.  A massive ork Waaagh had been building and right before the Iron Warriors had their hands on the Geneseed, two massive holes opened up in the earth and thousands of greenskins emerged within the fortress.

With the Marines Errant now surrounded by the forces of Chaos and the Orks, they stood little chance.  Very few loyal Space Marines escaped that day.

The Orks and the forces of Chaos weren't working together.  As the Iron Warriors grabbed the Geneseed and fled, the Orks were hot on their heels ready for another fight.

The Iron Warriors had a strong rear guard and were able to escape with the Geneseed, but the Orks wouldn't simply let them go.  In hot pursuit the Warsmith of the Iron Warriors called upon an ally who owed him to help slow down or possibly stop the Orks altogether.

Necrosius was that ally.  Necrosius' Apostles Of Contagion were joined by a detachment of the Iron Warriors' human traitor guard soldiers to fight the oncoming Ork Horde.

What came next was a bloody brutal fight...


Deployment:


 Orks Deployment

 Chaos Deployment

Whole Battlefield

The game was 2000 points. I took two 'The Purge' Detachments from the Siege Of Vraks forgeworld book.  The Purge Detachment is a Battle-Forged Detachment. It has a compulsory 1 HQ and 2 Elites.
It is available for both Codex Chaos Space Marines and the Traitors and Renegades list in Siege of Vraks.  It also allows your flamers and missile launchers to shoot chemical rounds which gives you shred but also gets hot.  The Detachment also allows 4 heavy support and more Elites and Troops and your barrage weapon templates stay on the board into your opponents turn.  The templates count as dangerous terrain.

The 2 major drawbacks of the Detachment is you do not have objective secured and you do not have access to any fast attack units.

The Campaign mission was fought on the planet False Hope the two squares being B20 and B21.

The first primary detachment:

HQ
Necrosius (Warlord)

Elites
6 Plague Marines in a Rhino

7 Plague Marines in a Rhino

The second detachment:

HQ
Traitor Company Command Squad

Elites
10 Disciples in a Chimera

10 Disciples in a Chimera

5 Disciples with Missile Launchers

5 Disciples with Missile Launchers

Troops
Infantry Command Squad with Krak grenades and a flamer
Infantry Squad with Krak grenades and a flamer

21 Plague Zombies

21 Plague Zombies

Heavy Support
3 Mortars

3 Mortars

2 Basilisks

Leman Russ


The Mission:
We played the City Fight Mission: Sniper's Alley.  It is from a White Dwarf.  It uses the City Fight Strategem cards which I printed out and taped onto regular playing cards.

The mission called for the two armies to deploy on their short board edges and only have an 18" deployment zone.  We decided to make it a 24" deployment zone instead, which is the standard size.


He deployed first and I siezed the initiative.

I deployed attempting to limit where he could arrive via outflank because he had three twin-linked rokkit buggies outflanking.
I put a lot of guardsmen on my right flank right on the board edge so he couldn't come on and right away frag my 2 Basilisks.


I tried to take advantage of having the first turn by moving up to intercept his battlewagon with a squad of Plague Marines with Meltaguns.

 Zombies and Rhinos Advance


The Zombies also moved forward an the rest of my army stayed put.  My Basilisks and mortars opened up killing some big gun crew and a few orks.

A Devastating Barrage

After my somewhat lackluster first turn, his nobs jump out from his battlewagon led by his warboss and assault a squad of guard, utterly annihilating them.

There used to be 10 guardsmen there.

My next turn I move to counter his assault by positioning Necrosius, two squads of Plague Marines, the zombies and another guard squad to block his movement and fire on them.

Necrosius unleashes Wasting Disease on the Warboss.

I also dropped mortars on the Orks, but to no avail.

The Warboss doesn't seem pleased.

He is able to assault a unit of Plague Zombies in his next turn.  

Mmm Ork brainz

Unable to stop the Warboss, he charges into my Plague Marines.  Using their Blight Grenades they slow down the orks and survive a round.


I then reposition my forces to get a better shot on the Nobs squad behind the Meganobs.


His warbuggies hadn't shown up yet, so I still needed to protect my weak right flank, otherwise I would have moved those guardsmen along the table edge.


In my turn again I drop down a nasty barrage into his Killer Kans and destroy several of them.
An ongoing battle with a squad of 10 ork boys and zombies continue as well.


The Warbuggies finally show up and on my left flank instead of my right.  The blow open a Chimera, but do little else.


The Orks Nobz and warboss finally take out the Plague Marines and consolidate back into the ruins.


I fire everything I have at the Nobs and they remain standing.  The only thing left to do is charge in with zombies.


Now that the warbuggies have arrived I can move my guardsmen on my right flank into the fight.

The Zombies killed all of the orks they had been fighting.

One squad of traitor guard charges into a killer kan and plants a Krak grenade on it, taking off a hull point!


.Necrosius moves around the large ruin to attempt to block off the rampaging warboss.  He leaves the Disciple squad to handle the one remaining warbuggy.


Unfortunately it was too little too late.  The Orks had succeeded in capturing more ojbectives than Necrosius' forces and the battle ended with an Ork victory.


Epilogue - 

Necrosius had ceded too much to the Orks this day.  He had let them capture a large portion of the city.  His delaying tactics were a bit on the conservative side but did allow the main Iron Warrior force to escape the Ork advance, for now.

The overwhelming firepower of the basilisks showed a sign of things to come, however.  The big guns of the Iron Warriors were still on False Hope and there were other battles to be fought.  

Until next time...