Wednesday, March 29, 2017

Victory is Vengeance Campaign!

Two weekends ago I played my first game of Tactical Strike!  It was the first game in a new Victory is Vengeance campaign that will pit my 30K Iron Warriors against my friend Seti's 30K Night Lords.

The Victory is Vengeance Campaign along with the Tactical Strike rules are located in Forgeworld's Horus Heresy Book 3: Extermination.  The campaign is focused around the loyalist survivors on Istvaan V and their attempts to survive and strike back at the traitors versus the traitor kill teams sent out to destroy them.

I have wanted to try these rules out for several years now and I was super excited when Seti suggested we try it!

Check out his blog at: Eye of Isha


Our first game was mainly a learning experience.  We wanted to get the basic rules down for Tactical Strike since there are a number of changes from the base 40k rules.

We decided instead of one of us being on the Survivor side and one being an Exterminator we would start the first game on an even footing and in the future we would change roles depending on the situation.

Since we wanted to start off on an equal footing we each set our Resources to "Plentiful".
Setting all of our resources to Plentiful meant that we each started with 300 points to spend on our Personnel (rank and file), our Armour was unaffected by any special rules and our Ammo Roll was on a 3+.

Ammo Rolls are used when a squad rolls a 1 to hit.  After that 1 is rolled then that squad must make an ammo roll or be out of ammo the following turn, meaning they can only fire snap shots.

In addition to the 300 points we are allowed 150 points to make one Hero character and up to two Leader characters.

My Tactical Strike Force

Thyrsis, Karapos and Peleus

My Tactical Strike force was as follows:

HERO - Vigilator Consul Karapos Lemnus
      Extra Wargear - None
      Role - Marksman

LEADER - Destroyer Sergeant Peleus
      Extra Wargear - None

LEADER - Tactical Sergeant Thyrsis
      Extra Wargear - Combi-Flamer and Heavy Chainsword

RANK AND FILE

7 Tactical Marines

1 Rhino with Extra Armour and Dozer Blade

2 Tactical Support Marines with Flamers

2 Tactical Support Marines with Plasma Guns

1 Cataphracti Terminator with Power Fist

1 Veteran with Missile Launcher and Machine Killer (+1 armour penetration)

1 Veteran with Power Sword and Weapon Master (+1 WS)

NOTE: After this past weekend and going to Adepticon we talked to the guys at Miniwargaming.com and I found out that my list was illegal.  You can only buy upgrades for models if you have the minimum number of models in the unit to purchase that item.
Basically I would have had to have 4 other veterans with Machine Killer before I could have bought the veteran with the missile launcher because you can only buy one missile launcher per 5 veteran marines.
My single veteran with the Power Sword was ok because any veteran can purchase a power weapon.


Our first mission was also one of our devising.

We had 4 objectives; each one is a, Emperor's Children Marine.  They would essentially become our captive after the battle.  Each once was worth d3 victory points and d3 x 10 supply points.

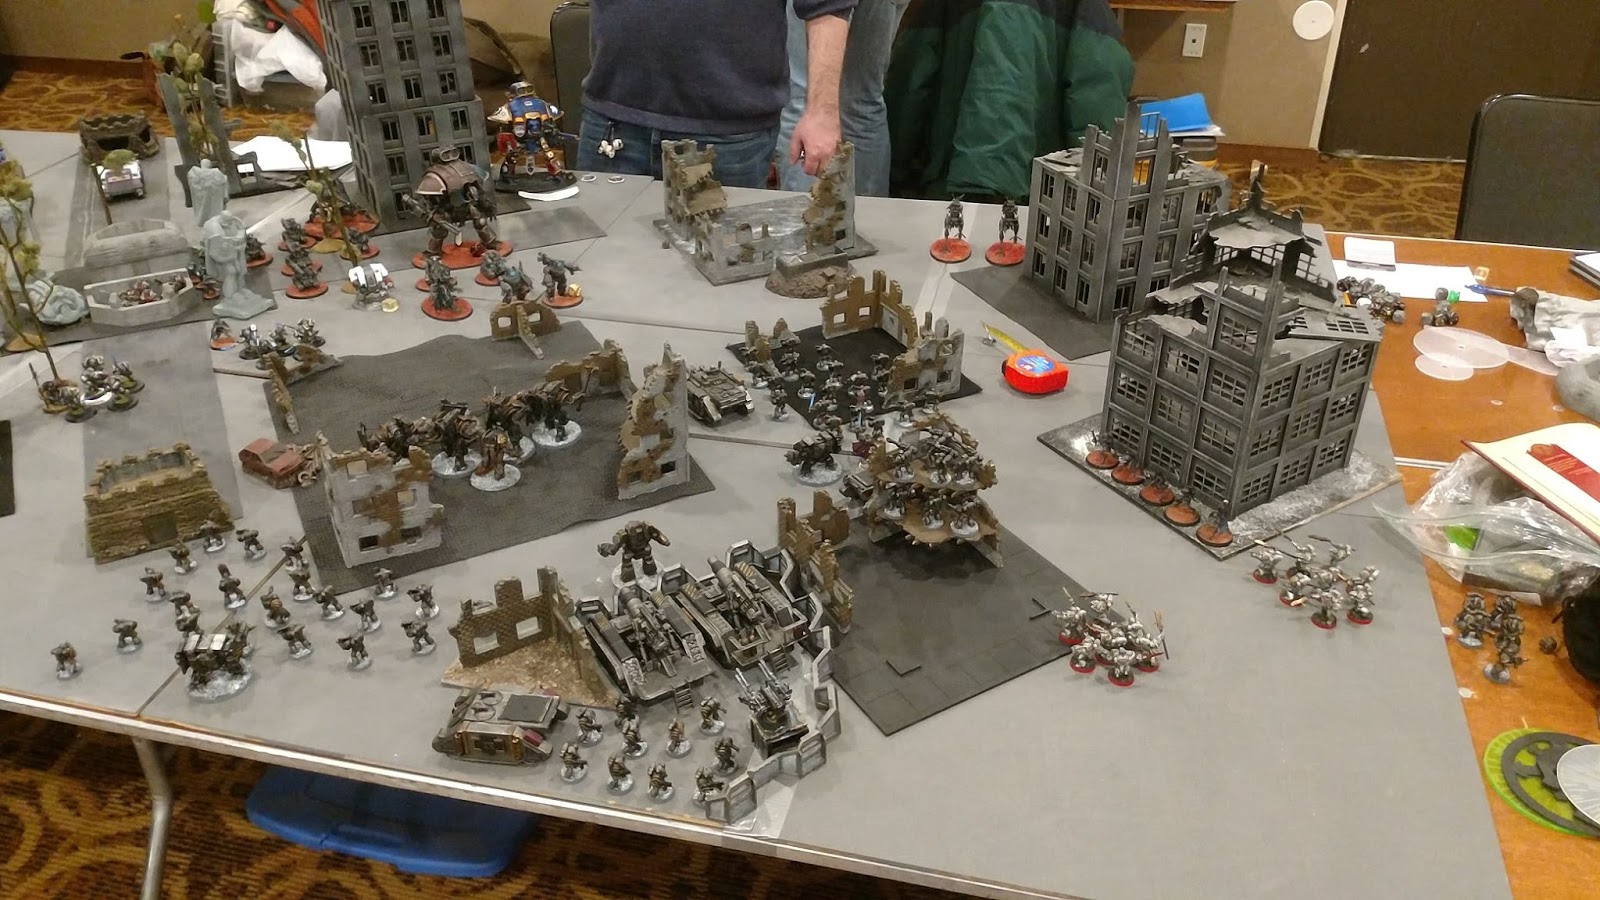
We set up in the "Stand-off" deployment, essentially right across from each other on a 4x4 board.

 He has 2 ad-hoc squads which start on the ground and 2 missile launcher vets 
which start on the upper levels of a couple of ruins.
I form 2 ad-hoc units as well.  One unit is deployed inside the rhino and the other is in 
the ruins on the left.  My Hero Karapos, scouts ahead into the center ruins.

 My Terminator lines up behind the tank traps.

The first turn is fairly uneventful and the second turn is when things get interesting; 
his land speeder flies in from reserve.

Our units move closer and Karapos Lemnus moves to the second floor.

Karapos is assaulted by his veteran-filled ad-hoc unit. 

 I break off 3 models to form a new ad-hoc unit while the terminator (who would soon die to Reaction fire) and the tactical marines prepare for some close-in action.

Karapos is down for the count and will have to roll on the Consequences and 
the Redemption & Atonement tables after the battle.

The land speeder just can't seem to kill my rhino. 

Eventually with help from his missile launcher vet, my rhino is destroyed and my ad-hoc squad led by Destroyer Sergeant Peleus jumps out ready to engage his ad-hoc unit. 

My other leader, Tactical Sergeant Thyrsis moves forward around some rubble to try and get a shot off at his missile vet while my few remaining tacticals try to fight off his veterans. 

I would eventually win this hand to hand fight and claim one objective. 

We played 5 turns and it took about 2 hours.  In the future games will be faster now that we have some idea of how the new rules work.

He ended up winning this game; claiming 3 objectives to my one.

We rolled for victory points and supply points.  I would end up with 2 victory points and 20 supply points while he had 7 victory points and 70 supply points.

Karapos Lemnus rolled "Blinded" on the Consequence table and "Martial Dominance" on the Redemption & Atonement table.
Being blinded means that I must reroll and successful shots over 12" and if i get it a second time then
I must reroll all successful shots.
Martial Dominance means that to eliminate my blinded consequence in the next battle I must remove more models in close combat than any other Hero.

Unfortunately Thyrsis was also killed so he won't be back, only Heros can return.

Overall it was a very fun game and I look forward to the next battle!

Until next time....

Wednesday, March 1, 2017

D-Company BIG GAME 2017 Coverage Part 3: 4,000pts IW Vs 2 Imperial Knights, Grey Knights and Ad Mech

Time for Game 2 of the 2017 D-Company Big Game!

This game was a 2 on 1 game.  I took 30K Iron Warriors featuring Perturabo and 4 of his Iron Circle and my opponents had multiple Imperial Knights and other nastys which you will see below in the pictures.

This was another custom scenario I came up with just for this game.  I wanted it to harken back to table quarters and city fight games of old.

Here are the scenario rules:

Story:

After pushing through the Jungle the day before Perturabo and his Iron Warriors have reached the city.  To ensure a Traitor victory the Imperial held city must fall!

The Mechanicum and Grey Knights await the Iron Warriors within New Jack City, they are dug in and ready to defend what is theirs.  Perturabo has hatched a plan, however to capture the city center and claim it for his own!

The Mission Overview:

By capturing quadrants and buildings the Iron Warriors can take the Imperial held city.  This won't be easy, however, because the Imperials were there first and they already control the majority of the city.

Victory Points:

Victory points will be awarded per side for accomplishing the following goals (whichever side scores the most victory points by the end of the game wins):

Quadrants: If at the end of the game your side controls your beginning quadrant your side gets 3 victory points.  If you control a quadrant that was unoccupied at the beginning of the game at the end of the game then your side gets 4 victory points.  If you control the opponents beginning quadrant at the end of the game your side get 5 victory points.

Buildings: At the end of each player turn if that player controls a building their side gets 1 victory point.  These points remain even if the opposing side captures the building later in the game.

Slay the Warlord: The player that kills an enemy Warlord gets 1 victory point.

The Price of Failure: The player that kills an enemy Lord of War gets 2 victory points. (This means that if a Primarch is killed that player probably gets 3 victory points for that Primarch because it is both a Lord Of War and a Warlord potentially.)

Deployment Map:

Search And Destroy (opposing Quandrants): See page 114 in "The Horus Heresy: Legiones Astartes Age of Darkness Army List" for the map.

Scoring Units and taking Buildings/Quadrants:

Use the Warhammer 40k definition for scoring units.  To control a Building/Quadrant there must not be any opposing units in that Building or Quadrant at the time when it is scored (ie. at end of player turn for buildings and at the end of the game for quadrants.)

First Turn and deployment:

Each side rolls a d6, whoever rolls highest picks their deployment zone.  The opposing side gets the opposite zone.
Then roll off again.  The Imperials get +2 on their roll (This represents the Imperials having home-field advantage).  Whoever rolls highest may choose to go first or second.  If they choose to go first then they also deploy their entire army first then the opposing side deploys their entire army.
Seize the Initiative: If the Iron Warriors are rolling to Seize the Inititave then they add +1 to their roll. (This represents the Iron Warriors being the attackers.)

Mission Length:

The game lasts for 6 turns.

-------------------------------------------------------

An without further adoo, here are some pics.

Initial Deployment 

The Iron Warriors go first and begin their attack with coordinated fire. 

The Imperials line up bracing for the onslaught. 

The Iron Circle and Perturabo attempt to advance through the ruins. 

After the first turn's firing, the Imperial's line has holes in it.

The Imperials begin deep striking in Grey Knight and Terminator squads. 

The Iron Warriors respond with heavy fire wiping out a squad that dropped behind their lines.  Perturabo and the Iron Circle continue their advance. 

Warsmith Martok leads a squad of Tactical Marines to engage the Ad Mech walkers. 

A tactical support squad loaded with flamers responds to the Grey Knights who dropped in, unleashing a hail of flame! 

The Iron Circle get closer to engaging the enemy. 

The Warsmith and large tactical squad eye up the enemy Ad Mech,

The Iron Circle charge into the Kastelan Robots and do minimal damage. 

 Another Grey Knight squad deepstrikes and attempts to destroy the Iron Havocs.

Martok and the tactical squad engages the Iron Striders. 

 The Imperial Knights close in on the combat.

 On the Iron Warriors' left flank some terminators deep strike in.

The Imperial Knight charges Perturabo.  He is unable to avoid its stomp....

The Iron Warriors charge into the Grey Knight squad. 

The other tactical squad charges into the terminators. 

The Iron Warriors in the building mop up the power-armoured Grey Knights. 

The larger squad that charged the terminators lost the combat and ran away, 
hoping to regroup next turn. 

With the Iron Circle and Perturabo out of the fight, the Imperial Knights are let loose.  

With the terminators advancing the Contemptor knows what must be done. 

As Ad Mech reinforcements arrive to shoot the tactical squad off the table, the Contemptor valiantly charges into the Grey Knight Terminators. 

 With most of the Iron Warriors' main battle line in ruins its only a matter of time.

The Tactical Support squad moves behind a building awaiting the end.

The Imperials win the day.  Seeing the end was near I capitulated.   The gambit with the Iron Circle and Perturabo would have worked if those Imperial Knights hadn't been there.  Getting Stomped to death is not a fitting end to Perturabo.  He will be back and in the future I will be more wary of Imperial Knights.

Anyways it was a fun game against two great opponents.

Next time will be the third and final game of my Big Game weekend.

Until then...